Overview
- Installation of the database software
- Installation of the software patch
- Configuration of the listener
- Creation of a database instance
Articles Related
Prerequisites
- Download the installation file : Oracle Database 10g Release 2 (10.2.0.1.0) for Microsoft Windows
- Download the last patch on Metalink
- If you are installing the database on a DCHP computer, you must install a loop back adaptater : Sitemap
- Use the System in the Control Panel to create the Oracle Database - ORACLE_HOSTNAME environment variable system Windows - Environment Variable. Set this variable to point to the host name of the computer on which you are installing Oracle Database.
Installation of the database software
Steps :
- Installation Method : Advanced Installation
- Select Installation Type : Entreprise Edition
- Specify Home Details : I let the default values
- Name : OraDb10g_home1
- Path : C:\oracle\product\10.2.0\db1
- Product Specific Prerequisite Checks : All status of the checks must be passed
- Select configuration option : Install Database Software Only
If you don't select this option and then you create a database, you have to migrate the database instance when you apply the patch and it's completely unnecessary.
- Summary : Review it and hit the Install button.
- The install windows process bar appear and let the place to the “End of installation” window
Installation of the software patch
This installation was made with the patch 10.2.0.3 that you can found on the support website of Oracle : metalink
Steps :
- Welcome : hit the Next button
- Specify Home Details : Choose the home of the previous installed database software :
- Product Specific Prerequisite Checks : All status of the checks must be passed
- Oracle Configuration Manager Registration : no need. Disable it.
- Summary : Review it and hit the Install button.
* The install windows process bar appear and let the place to the “End of installation” window which show this message :
The iSQL*Plus URL is:
http://oracle10g:5560/isqlplus

The iSQL*Plus DBA URL is:
http://oracle10g:5560/isqlplus/dba
Configuration of the listener
Start the Net configuration assistant :
- Start > All Programs > Oracle - OraDb10g Home1 > Configuration and Migration Tool > Net configuration assistant
Steps :
- Welcome : Let the default value : “Listener Configuration”
- Listener Configuration, Listener : Select “Add”
- Listener Name : Tape what you want of leave the default value : “LISTENER”
- Listener Configuration, More Listener ? : No
- Listener Configuration, TCP/IP Protocol : Use the standard port number of 1521
- Listener Configuration, Select Protocol : TCP and hit the next button
The listener must install. At the end of the installation, you must view it in the services.
Creation of a database instance
It's possible to create a database instance manually using command-line tools but the common way is to use the wizard Database configuration assistant that you can start by following this path :
- Start > All Programs > Oracle - OraDb10g Home1 > Configuration and Migration Tool > Database configuration assistant
Steps :
- Welcome : hit next
- Operations : Select “Create a database”
- Database Template : Select “Data Warehouse”
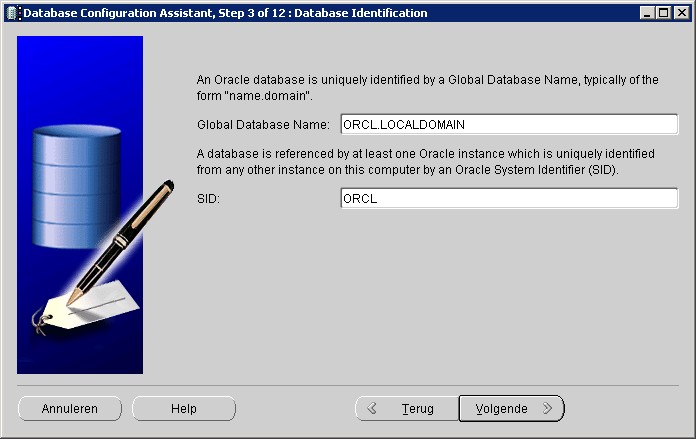
- Database Identification :
- Management Options : Check “Configure the database with Entreprise Manager”. Use Database Control, No Grid Control, No email
- Database Credentials : Use the same password for All Account (I tape pw)
- Storage Options : File System
- Database File Locations : Use Database File Locations from Template
- Recovery configuration : No check-box checked. No Flash recovery, no Archiving
- Database Content : Oracle Database - Sample Schemas checked,
- Initialization Parameters :
- Memory : default
- Sizing : default
- Character Set : AL32UTF8 to accept all languages.
- Connection Mode : Dedicated Server Mode
- Database Storage : Review the parameters and hit next
- Creation Option : “Create Database” checked
- Confirmation : Review the summary and confirm
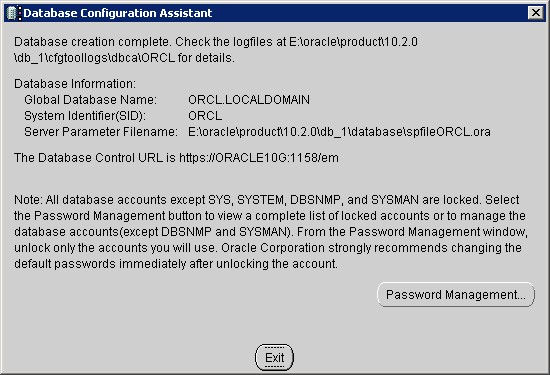
- Database Configuration Assistant Result :
By hitting the password management, you can unlock the sample schema account
Post Installation
More
ORADIM
Using ORADIM to Administer an Oracle Database Instance. The Log Files are located in this directory : Oradim (Startup log) Ora_home\database\oradim.log
Response Files
You can perform a silent installation of the Oracle database with the help of response file.
| Response File Name | This File Silently Runs The… |
|---|---|
| enterprise.rsp | Enterprise Edition installation type of Oracle Database |
| standard.rsp | Standard Edition installation type of Oracle Database |
| personal.rsp | Personal Edition installation type of Oracle Database |
| custom.rsp | Custom installation type of Oracle Database |
| dbca.rsp | Oracle Database Configuration Assistant |
| netca.rsp | Oracle Net Configuration Assistant |
| emca.rsp | Enterprise Manager Configuration Assistant |


