How to configure DKIM ?
This page is a step by step page that will show you how to sign outgoing email with the DKIM specification.
OpenDKIM will sign the email passed by Postfix and every receiver can check the email authenticity through the public key published in the DNS record of the domain.
The signature is added in the email in an header field. Example:
DKIM-Signature: v=1; a=rsa-sha256; c=relaxed/relaxed; d=bytle.net;
	s=vps748761.ovh.net; t=1591988898;
	bh=WBggpZrfs7F0OzQkyE7LiZPHyfFFhl7N4CNav2f5YVw=;
	h=Date:To:Subject:From:From;
	b=ByN4Iw4U9RP8bzaPK0n3HJbFlvI60ett+V9pkoli+UNtdAcSdq/ANc3hL71PzjrT4
	 3yyTjK3MC5e2f/k+BAnIaAgnradAK/1CbMF4vMZVD6WoVIx7KTZlfWsW39Ir8PhqYQ
	 4TKvPpDUx8ToxUz1gwQlxJoExYW3McXJ2WdvUAf8=
The configuration is done with OpenDkim installed as a milter software of Postfix (for the MTA) on a CentsOS (Redhat) linux box.
Steps
To install opendkim as a milter to an MTA, you need to perform the following steps:
- Generate a private and public key pair (to sign the mail) (skipped if you will only be verifying)
- Post the public key in the DNS space (also skipped if only verifying)
-
- Choose a local socket interface between the filter and your MTA
- Define a mapping between the domain and the key
- Restart all and test it
Installation
If you want to install it from the source. See the install doc
- install the EPEL repository
- install OpenDKIM
yum install -y opendkim
Generate the key and the DNS record with opendkim-genkey
The opendkim-genkey will:
- generate a private key in PEM format
- and output a TXT record containing the matching public key appropriate for insertion into your DNS zone file.
The private key signs the message (ie encrypt) and the public key can decrypt it.
As there is only one public key that can decrypt a message encrypted by the private key, the authenticity of the sender can then be verified.
This is a feature of the Public Key Cryptography system.
Syntax:
opendkim-genkey -s SELECTOR -d DOMAIN
# example with your brand name
opendkim-genkey -s brandName -d example.com
where:
- SELECTOR: a name given to the key to select the DNS record that stores the public key.
- DOMAIN is the DNS name of the domain
If you want to test it, you can add the --testmode argument.
testmode tells the verifiers that they should not take any real action based on success or failure of the use of this key after verifing a message.
In the generated TXT record, you will find back a t=y that you can remove to enter in production mode.
Two files should have been generated:
- the private key with the following name $(hostname).private
- the txt record (and the public key as value) with the following name $(hostname).txt
Verification of the file existence:
- the TXT record with the public key where you can verify your domain at the end of the file.
cat brandName.txt
yourSelector._domainkey	IN	TXT	( "v=DKIM1; k=rsa; "
	  "p=MIGfMA0GCSqGSIb3DQEBAQUAA4GNADCBiQKBgQDQUtHxTD63yxwq5fmjJ3RtXw2NP5/QEiSq3Xx85faTHnnj3/PA/igwWaueDsoeUuZOpkL74gDNGWBoQPecRaFrAXdPoEKGDYNBeMXzIkWQOth9Oaq4N+38LV08Ui86so8B2BhcvgXiqpACsrPur0hbDQWI183tZve7MKMPs3KPIQIDAQAB" )  ; ----- DKIM key vps748761.ovh.net for bytle.net
- The private (Should stay private, not shared). The private key encrypt the message and the public key decrypt.
ll brandName.private
-rw------- 1 root root 887 Jun 12 12:03 vps748761.ovh.net.private
DNS Zone
The next step is to publish the public key by creating a TXT DNS record with the help of the generated TXT file.
DNS DKIM value explained
The TXT record value generated has the form:
"v=DKIM1; k=rsa; " "p=public key"
where :
- v=DKIM1 is the DKIM protocol version.
- p=… is the public key (base64 encoded)
- k= provide a list of mechanisms that can be used to decode a DKIM signature such as RSA
DNS DKIM Creation
If the DNS interface of your provider supports TXT input, you can just take the input of the TXT file and add it at the end.

Then you should see a TXT record with a DKIM value. Example with a snapshot of the DNS manager of my domain provider

where the public key DNS record should appear as a TXT resource record as:
SELECTOR._domainkey.DOMAIN
# in the snapshot
vps748761.ovh.net._domainkey.bytle.net.
where:
- SELECTOR and DOMAIN are the value used when generating the key.
DOMAIN may also be specified:
- the Domain option in the configuration file,
- or the domain that would be returned from a KeyTable lookup.
DNS DKIM record test
You can verify that the key matches the private key with opendkim-testkey
opendkim-testkey -d DOMAIN -s $(hostname) -k $(hostname).private
# example
opendkim-testkey -d bytle.net -s $(hostname) -k $(hostname).private
If you got no message and an exit code of zero, that's all good.
echo $?
0
Private key
The key should be stored in a safe place.
- As we installed it with the package, we will store it /etc/opendkim/keys In the official doc, you will see /var/db/dkim/
mv $(hostname).private /etc/opendkim/keys
- The storage directory and the associated private key file should be owned by the user that will be executing the filter (preferably not the superuser) and be mode 0700 and 0600 respectively.
# The opendkim was created with the package installation
chown opendkim:opendkim /etc/opendkim/keys/ # should already by the case
chown opendkim:opendkim  /etc/opendkim/keys/$(hostname).private
chmod 0700 /etc/opendkim/keys # 0=rwx
chmod 0600 /etc/opendkim/keys/$(hostname).private # o=rw
OpenDKIM Configuration
The minimal configuration for OpenDKIM defines:
- the socket
FYI: The global configuration file can be found at:
/etc/opendkim.conf
Socket selection
The MTA and your opendkim filter communicate over a socket connection.
You can choose to use:
In case of a tcp socket, for selinux, the following command will need to be executed as the superuser, which declares the chosen port to be a milter application port:
# to see if SELINUX is enable
# cat /etc/selinux/config | grep -i SELINUX=
# if yes then
semanage port -a -t milter_port_t -p tcp <port>
The actual socket configuration of OpenDKIM is
##  Create a socket through which your MTA can communicate.
Socket	inet:8891@localhost
Mapping Key to Domain
KeyTable
OpenDKIM find the private keys with the KeyTable lookup file. It's a file that maps key names to signing keys. (private key)
Conf:
- Enable the key table refile means regular expression file (ie regular expression are permitted)
KeyTable refile:/etc/opendkim/KeyTable
- then change the mapping in the /etc/opendkim/KeyTable by adding the following line
SELECTOR._domainkey.DOMAIN DOMAIN:SELECTOR:/path/to/my/key
# or with this actual step by step
SELECTOR._domainkey.DOMAIN DOMAIN:SELECTOR:/etc/opendkim/keys/SELECTOR.private
It requires SigningTable be enabled.
SigningTable
This SigningTable is a file that maps:
- email addresses (ie from the From: header field)
- to one or several SELECTORs
- in order to apply one or more signatures to outgoing messages.
- and is a prerequisite of keytable
Conf:
- Global conf The refile scheme enable regular expression in the SigningTable file . You could also used file to disable it
SigningTable refile:/etc/opendkim/SigningTable
- SigningTable
# Wild card example (refile scheme)
*@DOMAIN SELECTOR._domainkey.DOMAIN
Operating mode
The operating modes are:
- s (sign)
- v (verify) - default
- sv (sign and verify)
You need to change it at minimal to s in order to sign the email.
Mode sv
Signing external mail
Optional
If you wish to sign mail that comes from sources other than the localhost address (127.0.0.1), include these in CIDR notation in the configuration file for the InternalHosts configuration option.
##  Identifies a set "internal" hosts whose mail should be signed rather than verified.
InternalHosts refile:/etc/opendkim/TrustedHosts
- See also:
##  Identifies a set of "external" hosts that may send mail through the server as one
##  of the signing domains without credentials as such.
ExternalIgnoreList refile:/etc/opendkim/TrustedHosts
MTA configuration (Postfix )
smtpd_milters
- smtpd_milters You specify SMTP-only Milter applications (there can be more than one) with the smtpd_milters parameter. Each Milter application is identified by the name of its listening socket;
Syntax:
smtpd_milters = inet:localhost:portnumber ...other filters...
With the OpenDkim Socket configuration of this tutorial (the default)
smtpd_milters = inet:localhost:8891
non_smtpd_milters
The non-SMTP Milter applications handle mail that arrives via:
- the Postfix sendmail command-line
- or via the Postfix qmqpd server.
non_smtpd_milters = inet:localhost:8891
Error handling
Optional
The milter_default_action property defines what to do in case of errors.
The following value can be chosen:
- tempfail (default) respond with a temporary error status, so that the client will try again later.
- accept to receive mail as if the filter does not exist
- reject to reject mail with a permanent status.
- quarantine action is like “accept” but freezes the message in the “hold” queue (from Postfix 2.6 or later)
milter_default_action = tempfail
Restart
Restart the services
systemctl restart opendkim
systemctl restart  postfix
Test
To test, we need to send an email and to see if the DKIM header was added.
If the test does not work, check the diagnostic section.
We show two ways to test:
- via mail-tester - graphical and all-in test solution
- via gmail - just send a message to check the header
Install a Mail Client
The client mail used is mail that you can install with the mailx package
yum install -y mailx
It's possible to send email with the sendmail command line of postfix
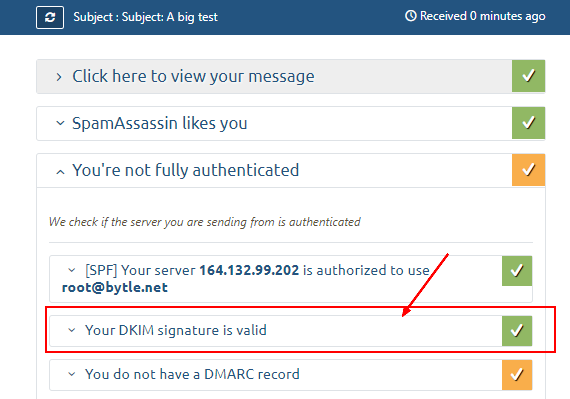
Mail tester
The first easy method to test is to send an email to the mail-tester website. They will then analyze it and give you a score.
- Note the temporary email (ie [email protected])
- And send an email
echo "Body: This is a test mail. Hallo Charlie" | mail -s "Subject: A big test" [email protected]
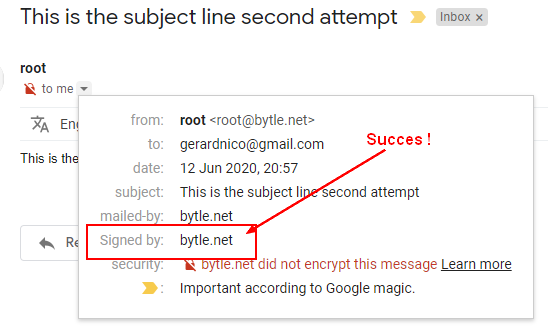
Gmail
Gmail allows you to see:
- the original email (header)
- and the test that they performs.
Send an email to your Gmail address
echo "Body: This is a test mail. Hallo Charlie" | mail -s "Subject: A big test" [email protected]
You can then verify the signing:
- in the original email

- or quickly in the dropdown:
Diagnostic
- Verify that you private / public key configuration is working. See DNS DKIM record test
opendkim-testkey -d DOMAIN -s $(hostname) -k /etc/opendkim/keys/$(hostname).private
- Check the mail log - postfix and openDKIM use syslog, you should find the log then in /var/log/ such as:
tail -f /var/log/maillog
- Example of log where you can see that opendkim added the DKIM-Signature field.
Jun 12 20:57:17 vps748761 postfix/pickup[22362]: D572A1FBE8: uid=0 from=<root>
Jun 12 20:57:17 vps748761 postfix/cleanup[23285]: D572A1FBE8: message-id=<[email protected]>
Jun 12 20:57:17 vps748761 opendkim[23276]: D572A1FBE8: DKIM-Signature field added (s=vps748761.ovh.net, d=bytle.net)
Jun 12 20:57:17 vps748761 postfix/qmgr[22361]: D572A1FBE8: from=<[email protected]>, size=521, nrcpt=1 (queue active)
Jun 12 20:57:18 vps748761 postfix/smtp[23288]: D572A1FBE8: to=<[email protected]>, relay=gmail-smtp-in.l.google.com[173.194.76.27]:25, delay=0.57, delays=0.06/0/0.35/0.16, dsn=2.0.0, status=sent (250 2.0.0 OK  1591988238 r8si6848556wrn.39 - gsmtp)
Jun 12 20:57:18 vps748761 postfix/qmgr[22361]: D572A1FBE8: removed
- Check that the DKIM process is started on the Socket port
netstat -tulpn|grep 8891
tcp 0 0 127.0.0.1:8891 0.0.0.0:* LISTEN 21636/opendkim
- Verify the postfix configuration
postconf -h smtpd_milters # inet:localhost:8891
postconf -h non_smtpd_milters # inet:localhost:8891
Documentation / Reference
This page was created with the help of the following references:
- The README document (in the opendkim directory) covers the installation and configuration of opendkim.
- A big thanks to easy engine
- The postfix documentation can be found at MILTER_README