Idea Plugin Dev - Action
Table of Contents
About
The system of actions allows plugins to add their own items to IDEA menus and toolbars.
The IntelliJ Platform provides the class AnAction, whose actionPerformed method is called each time you select a menu item or click a toolbar button.
Actions are organized into groups, which, in turn, can contain other groups.
A group of actions can form:
- a toolbar
- or a menu.
Subgroups of the group can form submenus of a menu.
Articles Related
Properties
- Action ID: The unique ID of the action. Recommended format: PluginName.ID
- Class Name: The name of the action class.
- Name: The name of the menu item or tooltip for toolbar button associated with action.
- Description: Optionally, enter the action description. The IDEA status bar indicates this description when focusing the action.
- Groups: Action Group,
- Actions
- Anchor Position of the newly created action relative to other existing actions. (First, Last, Before, After)
- Keyboard Shortcuts: the first and second keystrokes of the action.
Steps
To create custom actions in the IntelliJ Platform, you should perform two basic steps:
- In your plugin, define an action or a system of actions that add their own items to menus and toolbars.
- Register your actions.
Defining actions
An action is a class derived from the AnAction class. To define your action, in your plugin, create a Java class derived from the AnAction class. In this class, override the actionPerformed method to be called when a menu item or a toolbar button is selected.
public class TextBoxes extends AnAction {
// If you register the action from Java code, this constructor is used to set the menu item name
// (optionally, you can specify the menu description and an icon to display next to the menu item).
// You can omit this constructor when registering the action in the plugin.xml file.
public TextBoxes() {
// Set the menu item name.
super("Text _Boxes");
// Set the menu item name, description and icon.
// super("Text _Boxes","Item description",IconLoader.getIcon("/Mypackage/icon.png"));
}
public void actionPerformed(AnActionEvent event) {
Project project = event.getData(PlatformDataKeys.PROJECT);
String txt= Messages.showInputDialog(project, "What is your name?", "Input your name", Messages.getQuestionIcon());
Messages.showMessageDialog(project, "Hello, " + txt + "!\n I am glad to see you.", "Information", Messages.getInformationIcon());
}
}
Registering actions
Once you have defined an action or a system of actions, you must register them to specify the menu items or toolbar buttons associated with actions. You can register actions in one of the following ways:
- Register actions in the <actions> section of the plugin.xml file.
- Register actions from Java code.
Plugin.xml
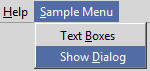
The following fragment of the plugin.xml file adds the Sample Menu group (item) to the main menu.
Clicking this item allows you to access:
- Sample Menu > Text Boxes and
- Sample Menu > Show Dialog menu commands:
<actions>
<group id="MyPlugin.SampleMenu" text="_Sample Menu" description="Sample menu">
<add-to-group group-id="MainMenu" anchor="last" />
<action id="Myplugin.Textboxes" class="Mypackage.TextBoxes" text="Text _Boxes" description="A test menu item" />
<action id="Myplugin.Dialogs" class="Mypackage.MyShowDialog" text="Show _Dialog" description="A test menu item" />
</group>
</actions>
where:
- MainMenu is an action group
Registering actions from Java code
See http://www.jetbrains.org/intellij/sdk/docs/basics/action_system.html#registering-actions-from-code
Wizard
A wizard simplify the creation of actions.
This wizard only add a new action to an existing action group on the main menu or toolbar. If you want to create a new action group, and then add an action to this group, you have to do it manually.
In the destination package:
- Alt + Insert or Right Click > New > Action