How to configure certification based client authentication with Nginx ?
About
This article shows you how to configure a client authentication via the ownership of a certificat on a Nginx web server.
Prerequisites
The server should be already configured for HTTPS as client certificate (client authentication) is a functionality of SSL (ie this is a step that is part of the handshake).
Steps
Server configuration
Create a root CA (ie a root private key and certificate)
In a client authentication mechanism, you are the root certification authority.
You create and sign certificate for your client (hence client certificate authentication) with your own private key.
Create a root private key and a ca certificate by following the example in this article: Root Certificate
If you want this certificate to sign only client certificate, you can set the pathlen to 0
basicConstraints = critical, CA:true, pathlen:0
NGINX server configuration
In the server block:
- set the list of authorized CA (there is only one) with the ssl_client_certificate option 1)
- set the verification on with the ssl_verification_one 2)
- redirect the possible verification error to an error_page 4)
server {
    # known / trusted client certificate authorities
    ssl_client_certificate /etc/nginx/client_certs/root_certificate.pem;
    # set the verification on
    ssl_verify_client on;
    # set the verification depth on the chain
    ssl_verify_depth 1;
    # you can also redirect the possible error code
    # error_page 495 496 =400 /400.html;
}
Test that the client authentication fails
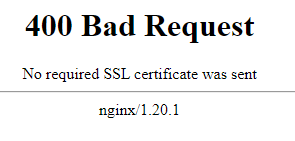
Without the customized error page, you should get the default 400 page.
For instance:
- with the browser,
- with curl:
curl -v https://example.com
*   Trying 192.98.54.226:443...
* Connected to https://example.com (192.98.54.226) port 443 (#0)
* schannel: disabled automatic use of client certificate
* schannel: ALPN, offering http/1.1
* schannel: ALPN, server accepted to use http/1.1
> GET / HTTP/1.1
> Host: https://example.com
> User-Agent: curl/7.79.1
> Accept: */*
>
* schannel: server closed the connection
* Mark bundle as not supporting multiuse
< HTTP/1.1 400 Bad Request
< Server: nginx/1.20.1
< Date: Tue, 08 Mar 2022 09:21:09 GMT
< Content-Type: text/html
< Content-Length: 237
< Connection: close
<
<html>
<head><title>400 No required SSL certificate was sent</title></head>
<body>
<center><h1>400 Bad Request</h1></center>
<center>No required SSL certificate was sent</center>
<hr><center>nginx/1.20.1</center>
</body>
</html>
* Closing connection 0
* schannel: shutting down SSL/TLS connection with https://example.com port 443
Creation and installation of a client certificate
Create the client private key and the certificate signing request
With openssl, create the private key client and a certificate signing request
The client DN information are in a configuration file
[ req ]
# Options for the `req` tool: PKCS#10 certificate request and certificate generating utility. (`man req`)
distinguished_name	= req_distinguished_name
# does not prompt for dn fields
prompt			= no

# Default md (message digest to use for the hash/fingerprint)
# option: SHA-1 is deprecated, so use SHA-2 family instead
# TLS server certificates and issuing CAs must use a hash algorithm from the SHA-2 family in the signature algorithm
# https://support.apple.com/en-us/HT210176
default_md          = sha256

[ req_distinguished_name ]
# CN used to create the CA root
C			= YourOrganisationCountry
O			= YourOrganisationFullName
CN			= TheUserName

[ client_extensions ]
# List of extensions to add to certificate generated
# It can be overridden by the -extensions command line switch.
# See the (`man x509v3_config`) manual page for details of the extension section format.
# See https://www.openssl.org/docs/man1.0.2/man5/x509v3_config.html
# for explanation

# A CA certificate must contains: CA: true
basicConstraints = critical, CA:false

# Purposes for which the certificate public key can be used for
# object short names or the dotted numerical form of OIDs (object identifier)
# OpenSSL has an internal table of OIDs that are generated when the library is built, and their corresponding NIDs are available as defined constants
# For example the OID for commonName has the following definitions:
#  * SN_commonName                   "CN"
#  * LN_commonName                   "commonName"
#  * NID_commonName                  13
#
# Example: new dotted NID object initialization
# int new_nid = OBJ_create("1.2.3.4", "NewOID", "New Object Identifier");
# ASN1_OBJECT *obj = OBJ_nid2obj(new_nid);
keyUsage = critical, digitalSignature
# Used for client auth / email protection
extendedKeyUsage=clientAuth

# as seen https://www.openssl.org/docs/man1.0.2/man1/openssl-req.html under v3_ca example
subjectKeyIdentifier=hash
authorityKeyIdentifier=keyid:always,issuer:always
- The openssl req 5) request
openssl req \
   -new `# Ask a certificate signing request`\
   -keyout client_private_key.pem `# The private key output (created if the key option is not given)` \
   -nodes `#don't encrypt the created private key` \
   -out client_csr.pem `# The certificate signing request (CSR) file ` \
   -config client.ini `# The client DN information`
- output
Generating a RSA private key
...........................+++++
.....................................................................+++++
writing new private key to 'client_private_key'
-----
Sign the certificate request with the root CA private key
Signing of the certificate with openssl x509 6)
openssl \
     x509 `# output a certificate`  \
    -req `#input is a certificate request, sign and output` \
    -days 365 `#How long till expiry of a signed certificate - def 30 days` \
    -in client_csr.pem \
    -out client_certificate.pem \
    -CA root_certificate.pem \
    -CAkey root_private_key.pem \
    -set_serial 0x"$(openssl rand -hex 16)"  `# large random unique identifier for the certificate. ` \
    -extensions client_extensions \
    -extfile client.ini
For the serial number, you need to provide an unique value with each signing. we provides a hash that should be unique (ie have zero chance of collision) (same than the rand_serial but our openssl version didn't had this extension)
Signature ok
subject=C = NL, ST = Noord-holland, L = Oegstgeest, O = Bytle, OU = Bytle, CN = foo, emailAddress = [email protected]
Getting CA Private Key
Creation of the client certificate - PKCS #12 (PFX)
To create a PKCS12 (old pfx) with:
- the client private key
- and the client certificate
run the below openssl command 7) and gives a passphrase to protect it (on transit such as email)
openssl pkcs12 \
    -export `# Create the p12 file ` \
    -out client_certificate.p12 `# file name created ` \
    -inkey client_private_key.pem `# File to read private key from ` \
    -in client_certificate.pem \
    -certfile root_certificate.pem `#A filename to read additional certificates from `
Test that the client certification authentication succeeds
Browser
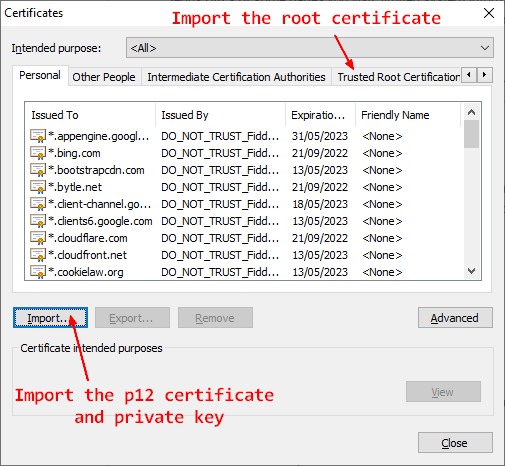
For every browser, you need to import:
- the pk12 (client certificate and client private key)
- the CA root certificate in the trusted root CA list
Chrome uses the windows store while Firefox uses its own truststore. The below procedure is for Chrome.
- In the address bar chrome://settings > Security and Privacy > Security > Manage certificates.
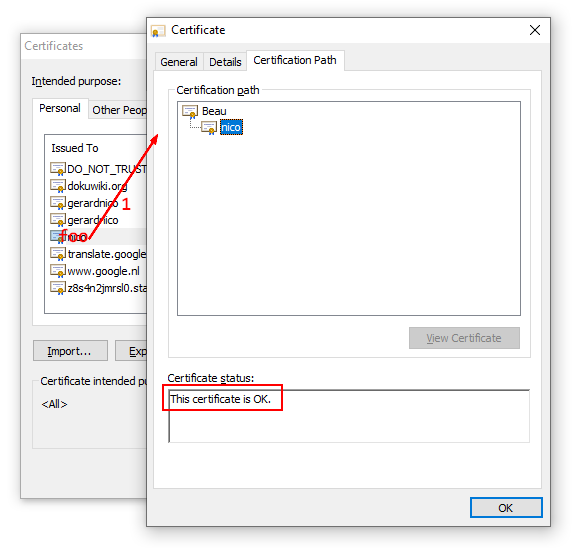
- Once imported you can verify the certificate. Search your certificate by the CN given during the creation, click on it and verify that it's ok.
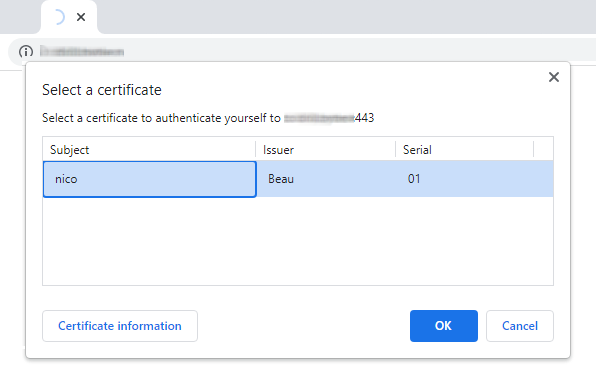
- Stop chrome, restart, open chrome and go to your website, chrome should propose you to choose the certificate.
- Once you choose your certificate, the normal home page for the website should show up.
Curl
With curl at the command line.
curl -v \
   --cert client_certificate.pem \
   --key client_private_key.pem \
   https://example.com
*   Trying 192.98.53.226:443...
* TCP_NODELAY set
* Connected to example.com (192.98.53.226) port 443 (#0)
* ALPN, offering h2
* ALPN, offering http/1.1
* successfully set certificate verify locations:
*   CAfile: /etc/ssl/certs/ca-certificates.crt
  CApath: /etc/ssl/certs
* TLSv1.3 (OUT), TLS handshake, Client hello (1):
* TLSv1.3 (IN), TLS handshake, Server hello (2):
* TLSv1.2 (IN), TLS handshake, Certificate (11):
* TLSv1.2 (IN), TLS handshake, Server key exchange (12):
* TLSv1.2 (IN), TLS handshake, Request CERT (13):
* TLSv1.2 (IN), TLS handshake, Server finished (14):
* TLSv1.2 (OUT), TLS handshake, Certificate (11):
* TLSv1.2 (OUT), TLS handshake, Client key exchange (16):
* TLSv1.2 (OUT), TLS handshake, CERT verify (15):
* TLSv1.2 (OUT), TLS change cipher, Change cipher spec (1):
* TLSv1.2 (OUT), TLS handshake, Finished (20):
* TLSv1.2 (IN), TLS handshake, Finished (20):
* SSL connection using TLSv1.2 / ECDHE-RSA-AES256-GCM-SHA384
* ALPN, server accepted to use h2
* Server certificate:
*  subject: CN=example.com
*  start date: Mar  7 19:55:54 2022 GMT
*  expire date: Jun  5 19:55:53 2022 GMT
*  subjectAltName: host "example.com" matched cert's "example.com"
*  issuer: C=US; O=Let's Encrypt; CN=R3
*  SSL certificate verify ok.
* Using HTTP2, server supports multi-use
* Connection state changed (HTTP/2 confirmed)
* Copying HTTP/2 data in stream buffer to connection buffer after upgrade: len=0
* Using Stream ID: 1 (easy handle 0x55b9461e5820)
> GET / HTTP/2
> Host: example.com
> user-agent: curl/7.68.0
> accept: */*
>
* Connection state changed (MAX_CONCURRENT_STREAMS == 128)!
< HTTP/2 200
< server: nginx/1.20.1
< date: Tue, 08 Mar 2022 11:02:51 GMT
< content-type: text/html; charset=utf-8
< content-length: 150
<
<html>
                        <head><title>Home page</title></head>
                        <body>
                        <h1>Home Page</h1>
                        </body>
* Connection #0 to host example.com left intact
</html>
OpenSsl
With openssl:
openssl s_client -connect host:4433 \
   -cert client_certificate.pem \
   -key client_private_key.pem  \
   -state
In the output:
- you can see that the server request client certificates
---
Acceptable client certificate CA names
C = NL, O = Foo, CN = Bar
Requested Signature Algorithms: ECDSA+SHA256:ECDSA+SHA384:ECDSA+SHA512:Ed25519:Ed448:RSA-PSS+SHA256:RSA-PSS+SHA384:RSA-PSS+SHA512:RSA-PSS+SHA256:RSA-PSS+SHA384:RSA-PSS+SHA512:RSA+SHA256:RSA+SHA384:RSA+SHA512:ECDSA+SHA224:ECDSA+SHA1:RSA+SHA224:RSA+SHA1
Shared Requested Signature Algorithms: ECDSA+SHA256:ECDSA+SHA384:ECDSA+SHA512:Ed25519:Ed448:RSA-PSS+SHA256:RSA-PSS+SHA384:RSA-PSS+SHA512:RSA-PSS+SHA256:RSA-PSS+SHA384:RSA-PSS+SHA512:RSA+SHA256:RSA+SHA384:RSA+SHA512
Peer signing digest: SHA256
Peer signature type: RSA-PSS
Server Temp Key: X25519, 253 bits
---
- you should see the client certificate on the server.
- If the client certificate was not requested by the server, you read in the output:
---
No client certificate CA names sent
Peer signing digest: SHA256
Peer signature type: ECDSA
Server Temp Key: X25519, 253 bits
---
- If you need to debug in depth, you can see more on this article: How to debug / test a TLS / SSL connection ?
Iphone
To be able to use the certificate on a mobile, you should install them at the operating system level.
For instance, on a iphone 8), to install the certificate on mobile:
- you send them by mail as attachement as p12 (The extension “.p12” is claimed by iOS and cannot be claimed by another app),
- Click on them on the email mobile app and download them.
- Go to the settings app and install the downloaded profiles (ie p12 and root certificate)
- Trust the root certificate in the Settings > Certificate trust settings
- Verify that your profile is valid in Settings >Vps & Device Management
Done
You need to preserve the cryptographic material. It can be done on a server with openssl for instance, were list keep track of issued certificate) but you can also save them in a key or password manager such as keepass.
Keep:
- your root private key and certificate if you need to create/sign new client certificate
- the signed client certificate (in case you need to revoke it)
That's all. Felicitations !
Support
Error: No required SSL was sent
400 Bad Request
No required SSL certificate was sent
nginx/1.20.1
The possible causes are:
- Proxy: Check that your are talking to your server directly and not through a proxy such as Cloudflare (passing client certificate via proxy is not the default, the certificate should be on the proxy)
- Check that the client certificate is valid. If you don't have the CA certificate set as trusted (ie in the truststore), it will not be send by the client
- Iphone: you should use Safari. Chrome, Firefox does not have access to the certificate
- A bad SSL configuration: check this page: How to debug / test a TLS / SSL connection ?
Debug
See How to debug / test a TLS / SSL connection ?
ca_certificate.srl: No such file or directory
When signing a request, you may get this error:
root_certificate.srl: No such file or directory
140102105605440:error:06067099:digital envelope routines:EVP_PKEY_copy_parameters:different parameters:../crypto/evp/p_lib.c:93:
140102105605440:error:02001002:system library:fopen:No such file or directory:../crypto/bio/bss_file.c:69:fopen('root_certificate.srl','r')
140102105605440:error:2006D080:BIO routines:BIO_new_file:no such file:../crypto/bio/bss_file.c:76:
SRL is an extension for a file that manages the certificate serial number sequencec.
You would get this error while signing the certificate:
- if you don't have enable the use of the SRL
- or if you don't have provided explicitly the serial number via the rand_serial or set_serial option.


