OBIEE 11g - Oracle Business Intelligence 11.1 Simple installation steps on Windows and OEL Linux 32 bit

About

This article covers the installation of Oracle Business Intelligence 11.1.

The term:

You can choose to install one, two, or all three of these products, using Oracle Business Intelligence Installer. Oracle Business Intelligence Installer creates all the runtime components and the infrastructure for the products you choose to install. After running Oracle Business Intelligence Installer, the installed products share the same Oracle Fusion Middleware infrastructure in a single WebLogic domain.

Good to know

Knowledge of:

By default, the Oracle Business Intelligence components are installed in a cluster configuration and are scalable.

You cannot add Oracle Business Intelligence to an existing domain created by Oracle WebLogic Server or another Oracle Fusion Middleware product.

After running Oracle Business Intelligence 11g Installer, the installed products share the same Oracle Fusion Middleware infrastructure in a single WebLogic domain.

All Oracle Business Intelligence products intended for a WebLogic domain must be installed and configured at the same time.

You cannot install some products now and then install others to the same WebLogic domain later.

For example, if you choose to install and configure Oracle Business Intelligence Enterprise Edition but not Oracle Real-Time Decisions, you cannot later add Oracle Real-Time Decisions to the WebLogic domain. Similarly, any WebLogic domains that contain Oracle Business Intelligence 11g products should not be extended later to include other Oracle Fusion Middleware products.

Installation

Type of installation

Type of installation Purpose Definition
Simple Install Demonstration and Evaluation
Single-User Development
Installation with the default settings on a single computer in the minimum number of steps
Enterprise Install Enterprise Deployment
for Hosted Development
and Production
Enterprise Install type enables you to specify several more configuration settings than the simple
Software Only Install Enterprise Deployment
for Highest Levels
of Availability and Security
Installation of the binary without configuration

System Requirement and certification

Before performing any installation, you should read the system requirements and certification documentation to ensure that your environment meets the minimum installation requirements:

  • system requirements for hardware and software requirements (minimum disk space and memory requirements, required system libraries, packages, or patches)
  • certification document for supported installation types, platforms, operating systems, databases, JDKs, and third-party products

You must read them for the products installed and for the Repository Creation Utility (RCU)

RCU is available only on 32-bit Linux and Windows platforms.

Below are the recommended hardware and system configuration requirements for an Oracle Business Intelligence installation on Linux and 32-bit Windows operating systems:

  • Disk Space: 20GB or more
  • Available Memory: 4GB or more
  • Temp Space: 950MB or more
  • Swap Space: 3GB or more
  • CPU: dual-core Pentium, 1.5GHz or greater

Prerequisites

Database

The database 11gR2 is required if you want to run the Oracle Business Intelligence Enterprise Edition Plus Samples

Oracle Fusion Middleware only supports schemas in a byte-mode database. The nls_length_semantics initialization parameter on the database must be set to BYTE; setting this parameter to CHAR is not supported.

Operating System

An Operating system installed: Windows or Linux (Linux - Installation)

On Windows

If you are installing Oracle Fusion Middleware on a Windows system, and that system already contains your Oracle Database, then you may encounter issues where the ORACLE_HOME global environment variable used by the database is overwritten by the Oracle Fusion Middleware product installation. As workaround, suppress it or set the value of ORACLE_HOME to the BI location in a DOS command.

On Linux

Creation of the installer user

On Linux, running Oracle Business Intelligence 11g Installer as the root user is not supported.

[[email protected] ~]# groupadd oinstall
  • Creation of the OBI User
[[email protected] ~]# /usr/sbin/useradd obi -g oinstall
[[email protected] ~]# passwd obi
Changing password for user obi.
New UNIX password:
BAD PASSWORD: it is WAY too short
Retype new UNIX password:
passwd: all authentication tokens updated successfully.
Creation of the Middleware Home directory
mkdir -p /MiddlewareHome
chown -R obi:oinstall /MiddlewareHome
chmod -R 775 /MiddlewareHome

where

  • Linux - chown: Change owner to the user obi
  • chmod 775: Everything is allowed for the owner and read and execute access are allowed for everyone
Package

The prerequis verification of the installer will check all package. With an Oracle Database 11g installed, you need only to install one package (compat-db-4.1.25-9) that you can get from yum of from the installation DVD.

On yum, I found the package compat-db-4.2.52-5.1.i386.rpm that I have copied and installed from the tmp directory.

[[email protected] tmp]# rpm -Uvh compat-db-4.2*
Preparing...                ########################################### [100%]
   1:compat-db              ########################################### [100%]
Set the File Handle Limit parameter

Set the hard and soft limit to the OBI user by modifying the file limits.conf such as for a database installation:

obi                 soft    nofile  4096
obi                 hard    nofile  65536

The maximum File-descriptor must be at least 4096

  • To discover the file-descriptor settings, run the command ulimit -a
  • Or set file-descriptor using the command ulimit -n 4096
[[email protected] dev]# ulimit -a|grep open
open files                      (-n) 4096
Environment Variable

You can add them in the .bash_profile shell startup script of the obi user.

# File Descriptor Limit
ulimit -n 10240

# Database Parameters
ORACLE_HOME=/u01/app/oracle/product/11.2.0/db_1
export ORACLE_HOME
TNS_ADMIN=$ORACLE_HOME/network/admin
export TNS_ADMIN
PATH=$ORACLE_HOME/bin:/opt/bin:$PATH
export PATH
LD_LIBRARY_PATH=$ORACLE_HOME/lib32:$LD_LIBRARY_PATH
export LD_LIBRARY_PATH

DHCP Computer

If you attempt to install on a machine that is using DHCP, does not have a primary DNS suffix, and does not have a loopback adapter configured, then the Oracle BI installer will stop at the screen prompting for the Administrator user details. This appears as a red cross in the tree on the left hand side of the installer. This issue is caused by the installer not being able to resolve the IP address to a hostname.

The workaround is to configure a loopback adapter or primary DNS suffix.

To configure a loopback adapter:

Get the installation files

Get the installation files from the Oracle Business Intelligence (11.1.1.x) Downloads OTN page

Alternatively you can get them from edelivery

:

  • for Oracle Business Intelligence
  • and for the RCU Fusion Middelware

On Windows systems, ensure that you do not extract the .zip file to a directory name containing spaces.

Remarks that you get the list of the software included

Creation of the metadata repository (with RCU)

Two metadata repositories are needed for:

Each Oracle Business Intelligence system (BI domain) requires its own set of database schemas. Two or more systems cannot share the same set of schemas (repository).

This requirement does not apply when you scale out an Oracle Business Intelligence system. In a scaled out (clustered) system, you only run RCU and install the database schemas once, before installing the primary node of the Oracle Business Intelligence cluster (the BI domain for the cluster gets created at that time). Additional Oracle Business Intelligence nodes that you install during the scale-out process become members of that domain and, therefore, use the same set of schemas.

Steps

  • Step 3 of 7: Component Detail > Select the Oracle Business Intelligence Compoment. This action automatically selects the Metadata Services (MDS) schema (under the AS Common Schemas group), which is also required by Oracle Business Intelligence.

  • Step 4 of 7: Schema Passwords > Use Same Password for all schemas (pwd)

From the documentation: If you do not select the Use same password for all schemas option and provide a single password for both schemas to share, issues might occur with your Oracle Business Intelligence installation.

  • Step 5 of 7: Map TableSpaces > Next. Validation. Ok.
  • Step 6 of 7: Summary > Next.

  • Step 7 of 7: Completion Summary > Close. The log files are in the directory RCU_HOME\log.

Installer

On Linux, running Oracle Business Intelligence 11g Installer as the root user is not supported.

To start the installer launch on the directory bishiphome/Disk1/ the file below:

  • setup.exe for Windows
  • ./runInstaller for Linux (without the sh extension)

On Windows, if you have downloaded the setup.exe installer in the C:\Document and Settings directory, and there is also the C:\Documents directory already present on your system, the installer will not start as it will attempt to locate files in C:\Documents. The work around is to either remove or rename the C:\Documents directory.

The Enterprise install type is not supported when installing on an AIX operating system or with a 64-bit JVM, such as on a supported 64-bit operating system. Instead, use the Software Only Install type.

Oracle Business Intelligence 11g Installer automatically assigns the Node Manager port (default = 9556), unless you specify your Oracle Business Intelligence ports manually using a configuration file such as staticports.ini. However, if installing Oracle Business Intelligence into a shared Fusion Middleware home where Node Manager is installed, Oracle Business Intelligence Platform Installer uses the existing Node Manager and its port number.

  • Step 1 of 12: Welcome > Next
  • Step 2 of 12: Type Install: Simple Install > Next
  • Step 3 of 12: Pre-requisite Check > Next

Windows: Minimum Memory: 1024 Mb, Service Pack 2, System: 5.1, 5.2, 6.0, 6.1 Linux: package: compat-db-4.1.25-9, kernel parameters (hard nofiles 4096, soft nofiles 4096)

  • Step 4 of 12: Middleware Home > Enter the directory path without trailing space. Ex:\ C:\MiddelwareHome

In a Windows environment, do not specify a Middleware home (MW_HOME) that is at the root of a drive (for example, C: or D:). Instead, install Oracle Business Intelligence into a path that is at least one directory level below the root drive (for example, C:\Oracle).

  • Step 5 of 12: Administrator Details. This account is use for the administration of the Weblogic Server and also for Enterprise Manager. Enter a user name and password. (in my case, weblogic/weblogic12)
  • Step 6 of 12: Configure Components. All > Next
  • Step 7 of 12: Database Details. Enter the details of your database with the credentials that you have specified in the Step 4 of 7 of the creation of the metadata repository (with RCU) > Next

  • Step 10 of 12: Installation Progress
  • Step 11 of 12: Configuration Progress

Configuration Log Location for Linux with an previous Database Installation: /u01/app/oraInventory/logs/install2010-10-12_11-59-20PM.log

  • Step 12 of 12: Summary

Windows:

Type: Simple Install
	Installation Details
		Middleware Home: E:\MiddelwareHome
		BI Oracle Home: E:\MiddelwareHome\Oracle_BI1
		WebLogic Server Home: E:\MiddelwareHome\wlserver_10.3
		BI Domain Home: E:\MiddelwareHome\user_projects\domains\bifoundation_domain
		BI Domain Name: bifoundation_domain
		Instance Home: E:\MiddelwareHome\instances\instance1
		Instance Name: instance1
	Configure Components
		WebLogic Console
			http://WINDOWS11G:7001/console
		Oracle Enterprise Manager
			http://WINDOWS11G:7001/em
		Business Intelligence Enterprise Edition
			http://WINDOWS11G:9704/analytics
		Business Intelligence Publisher
			http://WINDOWS11G:9704/xmlpserver
		Real-Time Decisions
			http://WINDOWS11G:9704/ui

Linux:

Type: Simple Install
	Installation Details
		Middleware Home: /MiddlewareHome
		BI Oracle Home: /MiddlewareHome/Oracle_BI1
		WebLogic Server Home: /MiddlewareHome/wlserver_10.3
		BI Domain Home: /MiddlewareHome/user_projects/domains/bifoundation_domain
		BI Domain Name: bifoundation_domain
		Instance Home: /MiddlewareHome/instances/instance1
		Instance Name: instance1
	Configure Components
		WebLogic Console
			http://oel11g.localdomain:7001/console
		Oracle Enterprise Manager
			http://oel11g.localdomain:7001/em
		Business Intelligence Enterprise Edition
			http://oel11g.localdomain:9704/analytics
		Business Intelligence Publisher
			http://oel11g.localdomain:9704/xmlpserver
		Real-Time Decisions
			http://oel11g.localdomain:9704/ui

Connection to the components

When a Simple Install concludes, the WebLogic Server and Oracle BI Server start, and a browser window opens to the home page for your Oracle Business Intelligence instance and you are able to connect with the administrator account (Weblogic/Weblogic12)

The default Oracle Business Intelligence URLs are the following (you can see them in the installation Summary step):

Next Steps

The administrator password of the repository is Admin123


Further

Patch

Configuration

Support

Log files

For more information about a specific error or warning that appeared during the installation process, refer to the installation log file. The location of the installation log file depends on your operating system and on where you opted to create the oraInventory directory for the first Oracle product you installed (that is, if multiple Oracle products are installed on the current computer).

The following are the default locations for supported operating systems:

  • Linux and UNIX: USER_HOME/oraInventory/logs/
  • Windows: C:\\Program Files\Oracle\Inventory\logs\

WebLogic Administration Server Fails to Start Due to Memory Issues

On Windows 32-bit operating systems, the WebLogic Administration Server may fail to start, as it cannot allocate sufficient memory despite the availability of free memory. As a workaround, complete the following steps:

  • Open the setSOADomainEnv.cmd file, located in your <Domain_Home>\bin directory, in a text editor.
  • Update the PORT_MEM_ARGS entry as follows:
  • set PORT_MEM_ARGS=-Xms512m -Xmx1024m
  • Save the file and close.

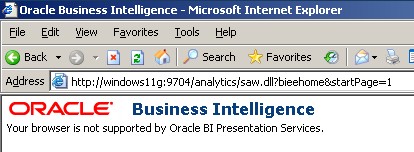
Internet Explorer 6 not supported ;-)
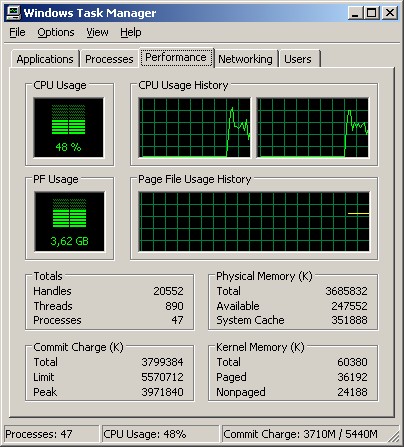
Resource Usage

Just for information.

Documentation / Reference

64 bit

11.1.1.3

11.1.1.5


Powered by ComboStrap