Android - Layout File (XML)
About
A layout XML is a declarative way of creating an UI.
To define the GUI in android, you can do it:
- at runtime in the code with the ViewGroup object (UI container) and View obejct (widgets)
- at load time through Layout XML files. This process is call inflation.
The XML vocabulary maps to the subclasses of ViewGroup (UI container) and View (widgets) .
The advantage to declaring your UI in XML is that:
- it enables you to better separate the presentation of your application from the code that controls its behavior.
- it makes it easier to visualize the structure of the UI
Layout XML files are resources.
Articles Related
Syntax
Each layout file must contain:
- exactly one root element, which must be a View or ViewGroup object
- zero or more additional layout objects or widgets as child elements
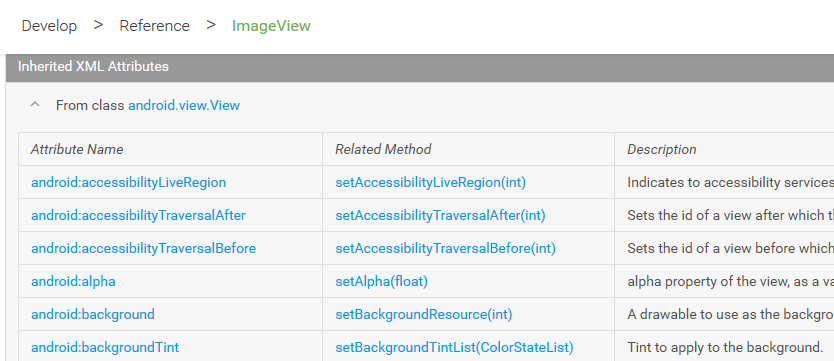
The XML attribute reference can be found in the API References
For example, for an imageView,
Example
Linear
<?xml version="1.0" encoding="utf-8"?>
<LinearLayout xmlns:android="http://schemas.android.com/apk/res/android"
              android:layout_width="match_parent"
              android:layout_height="match_parent"
              android:orientation="vertical" >
    <TextView android:id="@+id/text"
              android:layout_width="wrap_content"
              android:layout_height="wrap_content"
              android:text="Hello, I am a TextView" />
    <Button android:id="@+id/button"
            android:layout_width="wrap_content"
            android:layout_height="wrap_content"
            android:text="Hello, I am a Button" />
</LinearLayout>
where:
Data-binding layout
Data-binding layout files are slightly different and start with a root tag of layout followed by a data element and a view root element.
<?xml version="1.0" encoding="utf-8"?>
<layout xmlns:android="http://schemas.android.com/apk/res/android"
    xmlns:app="http://schemas.android.com/apk/res-auto"
    xmlns:tools="http://schemas.android.com/tools">

    <data>
        <!-- The variable within data describes a property that may be used within this layout. -->
        <variable name="ClassName" type="com.example.ClassName" />
        <variable name="user" type="com.example.User"/>
    </data>
     <LinearLayout
		 <FloatingActionButton
			android:id="@+id/fab"
			android:layout_width="wrap_content"
			android:layout_height="wrap_content"
			android:clickable="true"
			android:onClick="@{ClassName::onCreateFabClick}"
			android:tint="@android:color/white"
			app:fabSize="mini"
			app:srcCompat="@drawable/ic_create_black_24dp" />
                <!-- Expressions within the layout are written in the attribute properties using the "@{}" syntax -->
		<TextView android:layout_width="wrap_content"
			android:layout_height="wrap_content"
                        android:visibility="@{user.isAdult ? View.VISIBLE : View.GONE}"
			android:text="@{user.lastName}"/>
    </LinearLayout>
</layout>
Location
Default
All XML layout file are saved in the following directory:
res/layout/
Multiple Screens support
Directories
In the case of Multiple Screens support (see Configuration example), the main activity layout must be saved in the following directories:
- Handsets and tablets
res/layout/main_activity.xml           # For handsets, phone
res/layout-land/main_activity.xml      # For phone on landscape orientation
res/layout-sw600dp/main_activity.xml   # For tablets (sw means smallest width)
- Handset and two tablets:
res/layout/main_activity.xml           # For handsets (smaller than 600dp available width)
res/layout-sw600dp/main_activity.xml   # For 7” tablets (600dp wide and bigger)
res/layout-sw720dp/main_activity.xml   # For 10” tablets (720dp wide and bigger)
Layout file decision
The layout are chosen in a cascade way. For instance, with this directory structure:
res/layout
     main.xml
     detail.xml
     item.xml
res/layout-sw600dp
    detail.xml
    item.xml
res/layout-sw720dp
   item.xml
The following layout file will be chosen:
| Application is running on | Height | Width | Smallest Width (sw) | main.xml Directory | detail.xml directory | item.xml directory |
|---|---|---|---|---|---|---|
| Nexus 5 | 640 dp | 360 dp | 360 dp | res/layout | res/detail.xml | res/item.xml |
| Nexus 7 | 960 dp | 600 dp | 600 dp | res/layout | res/layout-sw600dp/detail.xml | res/layout-sw600dp/item.xml |
| Nexus 10 | 800 dp | 1280 dp | 800 dp | res/layout | res/layout-sw600dp/detail.xml | res/layout-sw720dp/item.xml |
Alias
The smallest-width qualifier is available only on Android 3.2 and above. Therefore, you should also still use the abstract size bins (small, normal, large and xlarge) to be compatible with earlier versions. See Layout Aliases
You can use refs.xml for your alias because it’a a more descriptive name thant layout.xml
Example from refs.xml
<resources>
    <!--
    For more on layout aliases, see:
    http://developer.android.com/training/multiscreen/screensizes.html#TaskUseAliasFilters
    -->
    <!-- Replace fragment detail view with layout that takes advantage of more available width.-->
    <item type="layout" name="fragment_detail">@layout/fragment_detail_wide</item>
</resources>
Built-in
Android has standard layout. They all begins with android.R.layout. See reference/android/R.layout.html
Load the XML Layout
To use the layout XML, you inflate it from an activity. See Android - Inflate (a layout XML to a view UI object).
Attribute Namespace
App
App Attributes are custom attributes defined in your app, whether by your code or by libraries you import.
It's a single global namespace for custom attributes - i.e., attributes not defined by the android system.
App attributes that don't exist are silently ignored.
For example:
- android:showAsAction was only added in API11 and will work only on all API above or equal to this level.
- app:showAsAction will work on all API levels
For instance, the appcompat-v7 library uses this app custom attributes mirroring the android: namespace ones to support all prior versions of android.
<FloatingActionButton
   app:srcCompat="@drawable/ic_add_black_24dp" />
Android
The android namespace are attribute defined by the android system.
Tools
the tools namespace that enable design-time features (such as which layout to show in a fragment) or compile-time behaviors (such as which shrinking mode to apply to your XML resources).
See Tools Attributes Reference
- tools:context declares which activity this layout is associated with by default.

