JMeter - (Sampler Result | Sample | Listener (Output|Results|Data) File)
About
The results of a sample are showed by a listener in different ways:
- a tree,
- tables,
- graphs
The sample result contains also the response data).
All listeners write the same raw data to the output file when one is specified.
Articles Related
Example
In a view tree listener, a sampler result for one sample.
Configuration
The same file name can be used by multiple samplers
with the same configuration
.
Result File Location
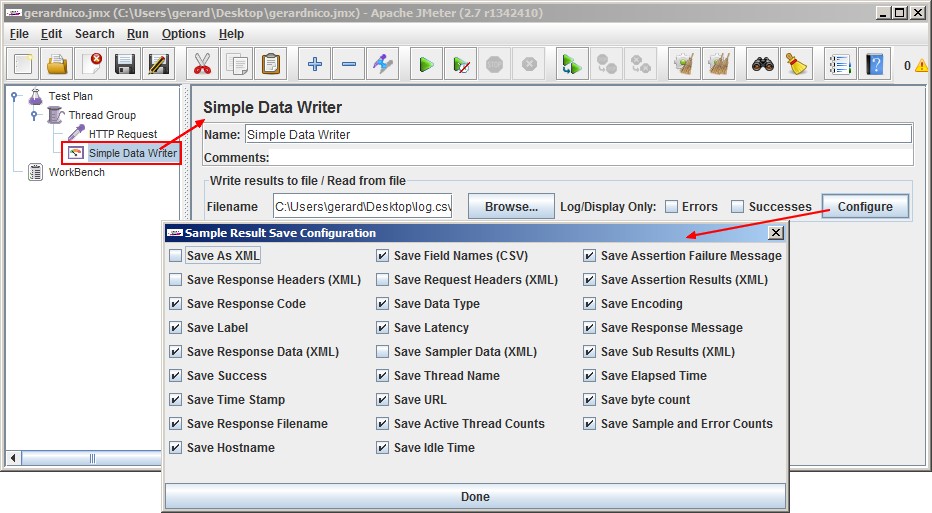
This listener can record results to a file but not to the UI. It is meant to provide an efficient means of recording data by eliminating GUI overhead.
When running in:
- GUI mode, use the listener Simple Data Writer
- non-GUI mode, the -l flag can be used to create a data file.
Property File / Gui
Relative Path
Relative paths can be specified to the:
- current working directory which defaults to the bin/ directory
- directory containing the current test plan (JMeter 2.4 and higher). The path name must begin with “~/” (or whatever specified in the jmeter.save.saveservice.base_prefix JMeter property)
JMeter Properties file example:
# Prefix used to identify filenames that are relative to the current base
jmeter.save.saveservice.base_prefix=~/
Format
The “Configure” button can be used to specify:
- whether to write it as CSV or XML.
- and which fields to write to the file
Csv
The CSV log format depends on which data items are selected in the configuration. Only the specified data items are recorded in the file. The order of appearance of columns is fixed, and is as follows:
| Field | Description | Value Example |
|---|---|---|
| timeStamp | The end time in milliseconds since 1/1/1970. | 1354223881017 |
| elapsed | in milliseconds | 1858 |
| label | sampler label | HTTP Request |
| responseCode | e.g. 200, 404 | 200 |
| responseMessage | e.g. OK | OK |
| threadName | Thread Group 1-1 | |
| dataType | e.g. text | text |
| success | true or false | true |
| failureMessage | if any | |
| bytes | number of bytes in the sample | 34908 |
| grpThreads | number of active threads in this thread group | 1 |
| allThreads | total number of active threads in all groups | 1 |
| URL | http://gerardnico.com/wiki/ | |
| Filename | if a Save Response to File listener was used and is placed before any other listener | |
| latency | time to first response | 132 |
| encoding | utf-8 | |
| SampleCount | number of samples (1, unless multiple samples are aggregated) | 1 |
| ErrorCount | number of errors (0 or 1, unless multiple samples are aggregated) | 0 |
| Hostname | where the sample was generated | LaptopNico |
| IdleTime | number of milliseconds of 'Idle' time (normally 0) | |
| Variables | if specified |
Default Values
The default items to be saved can be defined in the jmeter.properties (or user.properties) file.
#---------------------------------------------------------------------------
# Results file configuration
#---------------------------------------------------------------------------

# This section helps determine how result data will be saved.
# The commented out values are the defaults.

# legitimate values: xml, csv, db.  Only xml and csv are currently supported.
#jmeter.save.saveservice.output_format=xml


# true when field should be saved; false otherwise

# assertion_results_failure_message only affects CSV output
#jmeter.save.saveservice.assertion_results_failure_message=false
#
#jmeter.save.saveservice.data_type=true
#jmeter.save.saveservice.label=true
#jmeter.save.saveservice.response_code=true
# response_data is not currently supported for CSV output
#jmeter.save.saveservice.response_data=false
# Save ResponseData for failed samples
#jmeter.save.saveservice.response_data.on_error=false
#jmeter.save.saveservice.response_message=true
#jmeter.save.saveservice.successful=true
#jmeter.save.saveservice.thread_name=true
#jmeter.save.saveservice.time=true
#jmeter.save.saveservice.subresults=true
#jmeter.save.saveservice.assertions=true
#jmeter.save.saveservice.latency=true
#jmeter.save.saveservice.samplerData=false
#jmeter.save.saveservice.responseHeaders=false
#jmeter.save.saveservice.requestHeaders=false
#jmeter.save.saveservice.encoding=false
#jmeter.save.saveservice.bytes=true
#jmeter.save.saveservice.url=false
#jmeter.save.saveservice.filename=false
#jmeter.save.saveservice.hostname=false
#jmeter.save.saveservice.thread_counts=false
#jmeter.save.saveservice.sample_count=false
#jmeter.save.saveservice.idle_time=false

# Timestamp format
# legitimate values: none, ms, or a format suitable for SimpleDateFormat
#jmeter.save.saveservice.timestamp_format=ms
#jmeter.save.saveservice.timestamp_format=MM/dd/yy HH:mm:ss

# Put the start time stamp in logs instead of the end
sampleresult.timestamp.start=true

# Whether to use System.nanoTime() - otherwise only use System.currentTimeMillis()
#sampleresult.useNanoTime=true

# Use a background thread to calculate the nanoTime offset
# Set this to <= 0 to disable the background thread
#sampleresult.nanoThreadSleep=5000

# legitimate values: none, first, all
#jmeter.save.saveservice.assertion_results=none

# For use with Comma-separated value (CSV) files or other formats
# where the fields' values are separated by specified delimiters.
# Default:
#jmeter.save.saveservice.default_delimiter=,
# For TAB, since JMeter 2.3 one can use:
#jmeter.save.saveservice.default_delimiter=\t

#jmeter.save.saveservice.print_field_names=false

# Optional xml processing instruction for line 2 of the file:
#jmeter.save.saveservice.xml_pi=<?xml-stylesheet type="text/xsl" href="sample.xsl"?>

# Prefix used to identify filenames that are relative to the current base
#jmeter.save.saveservice.base_prefix=~/
JMeter variable
JMeter variables can be saved by configuring the jmeter.properties (or user.properties) file.
The values are written to:
- CSV files as additional columns,
- and as additional attributes in XML files.
# Optional list of JMeter variable names whose values are to be saved in the result data files.
# Use commas to separate the names. For example:
#sample_variables=SESSION_ID,REFERENCE
# N.B. The current implementation saves the values in XML as attributes,
# so the names must be valid XML names.
# Versions of JMeter after 2.3.2 send the variable to all servers
# to ensure that the correct data is available at the client.
How to
read an existing results file
- create a dummy test plan (If necessary)
- Add the appropriate Listener (If necessary)
- Select a file with the “Browse…” button


