Output - Informatica9 Installation Location:/
Informatica starting port number:6004
Database Type:ORACLE
Database Hostname:di-rep-db
Database Port number:1521
Database Service name:direp.hotitem.local
Database User ID:POW_DOM
PASSED: OS Version Check: RHL  Version Identified is 2.6.18-194.el5
PASSED: Diskspace: Available DiskSpace is 55105 MB
PASSED: Processors: Available Processors is 2
PASSED: Physical Memory: Available RAM Size is 4242 MB
PASSED: Temporary Space: Available temporary diskspace: 55105 MB. Sufficient for installation
PASSED: Socket Port: Socket port Range 6004-6009
PASSED: LANG Environment Variable: LANG Set to en_US.UTF-8 and LC_ALL Set to null
PASSED: JRE_HOME Environment Variable: JRE_HOME is not set
PASSED: File Descriptors : File descriptors limit is 3001
PASSED: Oracle Open Cursors: Open cursors in Oracle database is set to 1000Sufficient for install
PASSED : Resource privilege : The user account has the RESOURCE privilege.
PASSED: Create Table check : Successfully created a database table.
PASSED: Create View : Successfully created a database view.
Initial Server Software Installation
This sequence of installation don't say that you have to hit the next button and does not take care of review and informative windows.
[powercenter@di-obia-01 /]$ unset JRE_HOME
[powercenter@di-obia-01 /]$ /tmp/powercenter901/install.sh
OS detected is Linux
unjar task is in progress.............
You can wait a long time on this step ….
unjar of ESD completed.....
Do you want to continue installation (y/n) ?
y
Starting installation ...


\***************************************************************************
\* Welcome to the Informatica 9.0.1 HotFix 2 Server Installer.  *
\***************************************************************************


To verify whether a machine meets the system requirements for an Informatica installation, run the
 Pre-Installation System Check Tool (i9Pi) before you start the installation process. You can find the i9Pi
tool in the following directory: <InstallerExtractDirectory>/i9Pi


Before you continue, read the 9.0.1 HotFix 2 Installation Guide and Release Notes.
You can find the 9.0.1 HotFix 2 documentation in the Documentation Center at http://my.informatica.com
Configure the LANG and LC_ALL variables to generate appropriate code pages and
create and connect to repositories and Repository Services.
Do you want to continue? (Y/N)Y
Installer requires operating system Linux version 2.6 and later.
Current operating system Linux version 2.6.
Current operating system meets minimum requirements.

 Select a choice :
1.   Install Informatica 9.0.1 with Hot Fix 2 or Upgrade from a previous version of Informatica to
 Informatica 9.0.1 with Hot Fix 2
2.   Apply Informatica 9.0.1 Hot Fix 2 to existing 9.0.1 install.
Enter the choice(1 or 2):1

-----------------------------------------------------------
Checking for existing 9.0.1 HotFix 2 product installation.
Select (G)UI mode (needs X Window support) or (C)onsole mode (G/C):G
Launching installer in GUI mode ...
Preparing to install...
Extracting the JRE from the installer archive...
Unpacking the JRE...
Extracting the installation resources from the installer archive...
Configuring the installer for this system's environment...

Launching installer...

Preparing SILENT Mode Installation...

===============================================================================
Informatica 9.0.1 Services HotFix2               (created with InstallAnywhere)
-------------------------------------------------------------------------------
Informatica 9.0.1 HotFix 2 Steps:- Installation Type: Install (and not upgrade)
- Pre-requisites: Next
- License and Directory. (Transfer the license file from the client zip file)

- Pre-Installation Summary: Install (Required Disk Space 2815 MB)
- Domain Creation: Create a domain
- Configuration Database

with as JDBC parameters:
MaxPooledStatements=20;CatalogOptions=0;BatchPerformanceWorkaround=true
- Domain Configuration


- Post-Installation Summary
Installation Status:: SUCCESS
The Informatica 9.0.1 HotFix 2 installation is complete.

For more information, see the debug log file:
/powercenter/Informatica/9.0.1/Informatica_9.0.1_Services_HotFix2.log

Informatica Administrator Home Page http://di-obia-01.hotitem.local:6007
Product Name : Informatica 9.0.1 HotFix 2

Installation Type : Fresh Installation
Installation Directory : /powercenter/Informatica/9.0.1
- Login to the Administration console with the Administrator user (Administration/Administrator)

Repository Configuration
- Start Informatica services. Start > All Programs > Informatica PowerCenter 8.6.1 > Services > Start Informatica Services.
- Launch the Administration console. Start > All Programs > Informatica PowerCenter 8.6.1 > Services > PowerCenter Administration Console
- Login with the account given in the configuration (admin/admin for this article).
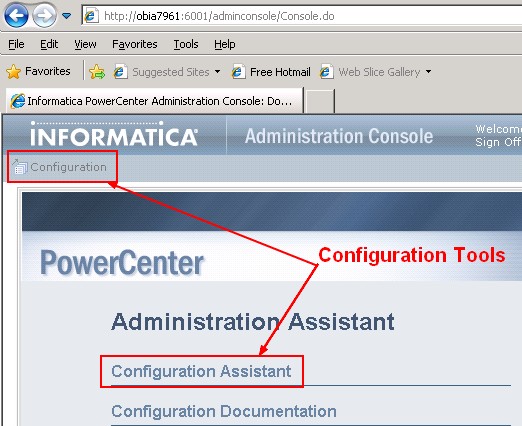
- Select configuration assistant (if you don't see it, you can also configure a repository with the configuration tool on the left side)
- Welcome > Next
- Enter a name for the repository, click on the configure button and fill in the fields. You must enter a connect identifier and not a connect string. The connect string for Oracle contains the credentials.
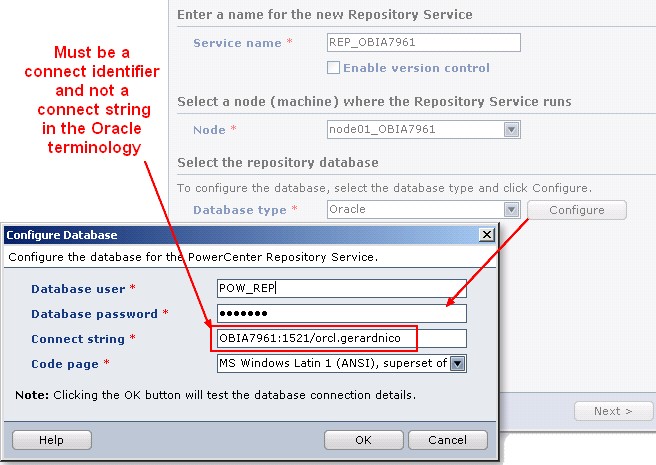
If the creation of the repository hang, try to give the DBA privileges to the oracle database account POW_REP
- Integration service: fill a name in : INT_OBIA7961 and click next.
- Character Data for Integration service: (Note: Character Encoding give the choice between ASCII and Unicode)

- Finish !
A global administrator (for the domain and the repository) is automatically created during the installation with the credentials Administrator/Administrator. You may change the password for security purpose
Client
Installation Steps:- Double click on the file install.bat located in this directory : File1\pc861_client_win32_x86\
- Choose Language. Next
- Choose Install Option. Next
- Prerequisites. Next
- Installation directory For the path, you can leave the default value because it doesn't contain space C:\Informatica\PowerCenter8.6.1
- Pre-installation summary. Next
- Post-installation summary. Next
- Installation Complete. Done
- file2>pc861_HotFix10_Client\install.bat
- Select Language. Ok
- Welcome. Next. Stop PowerCenter. Ok
- Installation Prerequisites. Next
- Installation Type: Apply. Next
- Installation Directory. Next
- Pre-installation summary. Next
- Post-installation summary. Next
- Installation Complete. Done
-
- PowerCenter Mapping Architect for Visio (Data Stencil?)
- Custom Metadata Configurator
Support
The creation of the repository hangs
The creation of the repository can take maximum 2 minutes. If you don't see the creation of tables in the POW_REP schema:- close the browser,
- connect again to the administation console and go through the configuration button in the left upper side
- give the DBA privileges to the oracle database account POW_REP
- and try to create it again
Reference
- You can find valuable information in the installation and configuration guide (PC_861_InstallationGuide.pdf) delivered with the file2.