Introduction
Write Back is the ability to enter values directly into a report and have those values used in calculations and charts in the report. For example, a report can have Sales Quota Amount defined as a write back field, Sales Amount as a field from the data warehouse, and Percentage of Quota as a calculated field (Sales Amount/Sales Quota Amount). When viewing the report you can change the Sales Quota Amount and the Percentage of Quota field recalculates appropriately.
This document give a step-by-step guide with picture to help the implementation of this functionality.
You can use this functionnality only in a table view. If you want to use it on a pivot, you must first transform your table view as a pivot view : OBIEE - How to perform a pivot in a table view
Articles Related
How to
Security, Privileges
First, you must grant your account with the privilege “Write Back to database” :
- Login in OBI Presentation Service Website
- Follow this links : Setting / Administration / Manage Privileges
- Grant the privilege “Write Back to database” to the permitted group
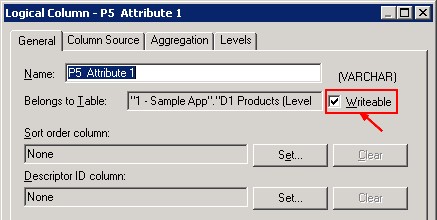
Second, you must grant the direct access database to the user through the Administration Tool in the security part.
- Login in OBI Administration
- Go to the menu : Manage / Security
- Grant the privilege “Execute Direct Database Access” to the permitted group of user
Configure Write Back Report
Instanceconfig.xml
In 11g only, add the following LightWriteback element in the file Instanceconfig.xml
<WebConfig>
    <ServerInstance>
        <LightWriteback>true</LightWriteback>
    </ServerInstance>
<WebConfig>
Table properties
You must choose a report in Answers to be able to writing back to the database.
- Go to the Table Component
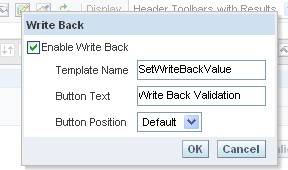
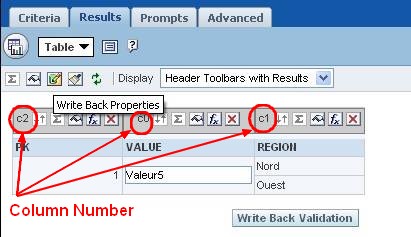
- Click on the write back properties icon (a green database with a yellow pen). Remark that each column have on this head a letter C and a number (Ex. c1, C2, … )
- Fill the template name with for example : SetWriteBackValue. (This name will indicate later the statement to update or insert in the database)
Column properties
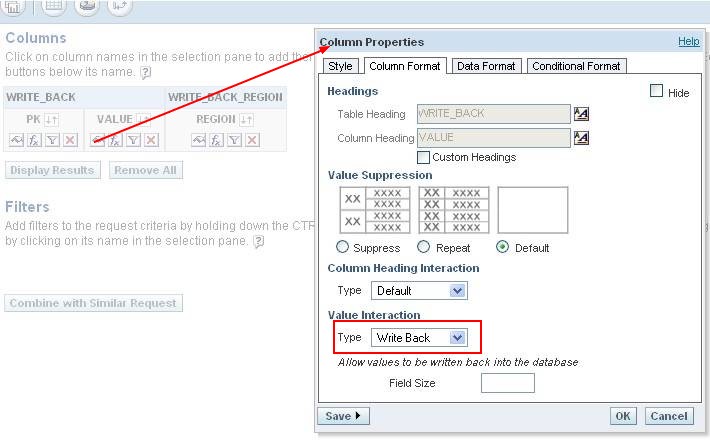
- Set to “write back” the value integration type of the column you want to be able to update.
Write Back Template to define the DML statement
The write back template is an custom messages (XML-formatted) file that contains SQL commands needed to insert and update records in the write back table and columns you have configured. It must be store in the directory:
- 10g: "OracleBI\web\msgdb\customMessages".
- 11g: The path of the CustomerResourcePhysicalPath node in the instanceconfig.xml + /customMessages. This is the directory for static files and customer messages. Example: ORACLE_INSTANCE/bifoundation/OracleBIPresentationServicesComponent/coreapplication_obipsn/analyticsRes/customMessages
<?xml version="1.0" encoding="utf-8" ?>
<WebMessageTables xmlns:sawm="com.siebel.analytics.web/message/v1">
   <WebMessageTable lang="en-us" system="WriteBack" table="Messages">
      <WebMessage name="SetWriteBackValue">
         <XML>
            <writeBack connectionPool="Connection Pool">
                <insert>INSERT INTO OTHER_SCHEMA.WRITE_BACK VALUES (@{c0})</insert>
                <update>UPDATE OTHER_SCHEMA.WRITE_BACK SET VALUE='@{c0}' WHERE PK=@{c2}</update>
	    </writeBack>
         </XML>
      </WebMessage>
   </WebMessageTable>
</WebMessageTables>
The line <WebMessage name="SetWriteBackValue"> contain the value of the template name. This value must match with the value filled in the table properties.
The line <writeBack connectionPool="Connection Pool"> contain the value of the connection pool. You must have the same name in the repository.
The line <update>UPDATE WRITE_BACK SET VALUE='@{c0}' WHERE PK=@{c2}</update> contain the SQL statement to update the database.
Values can be referenced either by position (such as @1, @3) or by column ID (@{c0}, @{c2}). To find the column ID, see the header columns labels in the table
The custom message are loaded when the OBI Presentation Service is started therefore reload them before testing (if it doesn't work, you can restart it)
When the update and insert statement run
- The insert command runs when the update value is null.
- Update command runs when a user modifies existing data.
How to update
You are now able to launch “Write Back” capabilities !
- Change the value of the column that you have configured (Here above the VALUE column)
- Click on the button in the bottom-right corner of the table (Here above the WRITE BACK VALIDATION button)
Support
Log
sawlog
OBIEE 10G/11G/12C - Presentation Services log (sawlog.log)
Type: NOTIFICATION
Severity: 20
Time: Tue Sep 29 09:57:02 2015
File: project/webconnect/connection.cpp Line: 879
Properties: HttpCommand-WriteBack;AuthProps-AuthSchema=UidPwd|PWD=******|UID=ngerar|
NQ_SESSION.RUNAS=myRunasUser|User=ngerar|RunAs=ngerar|
GUID=9f13371e0c8d447ea529d8b93c5870a8;SessionID-192.168.50.230.70.84n5b1b;RemoteIP-192.168.50.230
Location:
	saw.connection.runImmediatelyImpl
	saw.writeback.action.executeimpl
	saw.writeback.action.execute
	saw.writeback.execute
	saw.httpserver.processrequest
	saw.rpc.server.responder
	saw.rpc.server
	saw.rpc.server.handleConnection
	saw.rpc.server.dispatch
	saw.threadpool.socketrpcserver
	saw.threads

Running SQL: EXECUTE PHYSICAL CONNECTION POOL myConnectionPool myStatement
nqquery.log
OBIEE 10G/11G - Nqquery.log (Query logging)
[2015-09-29T08:09:27.603+02:00] [OracleBIServerComponent] [TRACE:2]
[] []
[ecid: 99b264eb267f4da4:-3524ab22:15000fd9a26:-8000-0000000000191445,0:1:3]
[tid: 4d6bb940] [messageid: USER-18] [requestid: ac0000c] [sessionid: ac00000]
[username: userName] --------------------
Sending query to database named myDatabase (id: ExecutePhysical Gateway), connection pool named MyConnectionPool,
logical request hash 1131f667, physical request hash 6d1fef61:
[[
myStatement
]]
nqserver.log
Only for errors: OBIEE 10G/11G - NQServer.log
[2015-09-28T12:19:49.936+02:00] [OracleBIServerComponent]
[ERROR:1] [] [] [ecid: 99b264eb267f4da4:-3524ab22:15000fd9a26:-8000-00000000001450cf,0:1:3] [tid: 4fe2a940]
[nQSError: 13017] User or application role has not been granted the Direct Database Access privilege
to access the database 'databaseName'. Please verify the User/Group Permissions in the Oracle BI Administration Tool. [[
file: server/NQSNative/NQSServEntry/Source/NQSExecPhysSQL.cpp; line: 83

**********  Task: 1. Running for (mls): 1 **********
Description: Prepare Logical Request
User: UserName
SessionID: 530448384
ProcedureID: -1
SQL: EXECUTE PHYSICAL CONNECTION POOL ConnctionPoolName
statement;
]]
Reload the change online
The files are loaded in memory. You can reload them via Admin > Reload Files and Metadata link.
10G: the Update Button is grey
The write back button is grey when Oracle BI Presentation server hasn't found the XML template message.
Two reasons for this :
- The name of the template name in the report is different than in the XML message.
Example with the name : SetWriteBackValue

must be the same in the node WebMessage of the xml message :
<WebMessage name="SetWriteBackValue">
- Or may be you simply forgot to restart the OBI Presentation Service. (The messages are loaded during the initialization)
Documentation / Reference
- This document was made with the help of the original documentation : 10G - Oracle® Business Intelligence Presentation Services Administration Guide, Configuring Report Write Back p.90.


