About
The process for building the Analytic Workspace is quite different to the approach for materialized views.
Articles Related
Analytic Workspace Manager (AWM)
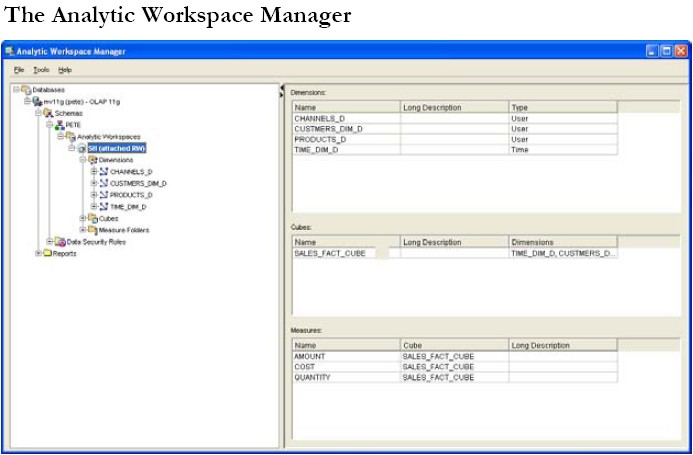
There is no equivalent of the SQL Access Advisor to recommend the cubes required, however, there is the Analytic Workspace Manager (AWM) which is the principal GUI based administrative tool for building and managing analytic workspaces. AWM has been enhanced for Oracle Database 11g and is provided on the Client CD.
AWM, as illustrated in the figure below, considerably simplifies the process of creating the Analytic Workspace and enables anyone from a DBA to a business analyst to design the OLAP data model with the dimensions and hierarchies, map their data sources to the dimensions and cubes and then populate them.
Step by Step
Step 1 Analysis to Determine the Analytic Workspace Content
Before the analytic workspace can be defined, as per the approach for creating a materialized view, some analysis work must first be performed to identify what information it must contain. With respect to Oracle Database 11g, consideration should also be given to whether the new MV OLAP feature will be used. This will be discussed in a later section on accessing the analytic workspace using SQL. We begin by looking at the type of queries our business users will be running and our data and determine which dimensions we need; which will be Time, Customers, Products and Channels and the physical tables where that data resides. Then we need to determine what cubes we require and the actual data we need to hold in the cubes. In this example, this is amount sold and quantity sold, which are physically stored in the SALES_FACT table, and the product unit cost data from the COSTS_FACT table. Typically, only a single analytic workspace (AW) is needed to contain the required objects to answer the users business queries. For example, our one will comprise of four dimensions and two cubes and the table below lists what must be created and the data source for each object.
| Target AW Object | AW Object Type | Relational Source Table |
|---|---|---|
| PRODUCT | DIMENSION | PRODUCTS |
| CHANNEL | DIMENSION | CHANNELS |
| CUSTOMER | DIMENSION | CUSTOMERS_DIM |
| TIME | DIMENSION | TIME_DIM |
| SALES | CUBE | SALES_FACT |
| COSTS | CUBE | COSTS_FACT |
Step 2 Creating the Analytic Workspace
The first step is to create the analytic workspace in which the dimensions and cube will reside. Creating the analytic workspace using AWM simply requires naming the analytic workspace and identifying the tablespace where it will be located.
Step 3 Creating the Dimensions
An analytic workspace actually comprises a number of different types of objects, the principal ones we will be concentrating on are:
- Dimensions including their hierarchies, levels and attributes,
- Cubes
Dimensions are used to define the multi-dimensional data in a cube and must be created first in order to use them to create the cube. Dimensions in an analytic workspace can be either :
- level based, the same as the relational dimension object,
- or can be value based (which is also known as a parent-child hierarchy).
The information required to create a dimension within an analytic workspace is very similar to that for the SQL dimension created earlier. A dimension is created by first creating the level information and then the hierarchies that group the levels in the correct order top to bottom. Finally, any additional attributes for the levels are created and assigned to the correct levels.
Step 4 Populating the Dimensions
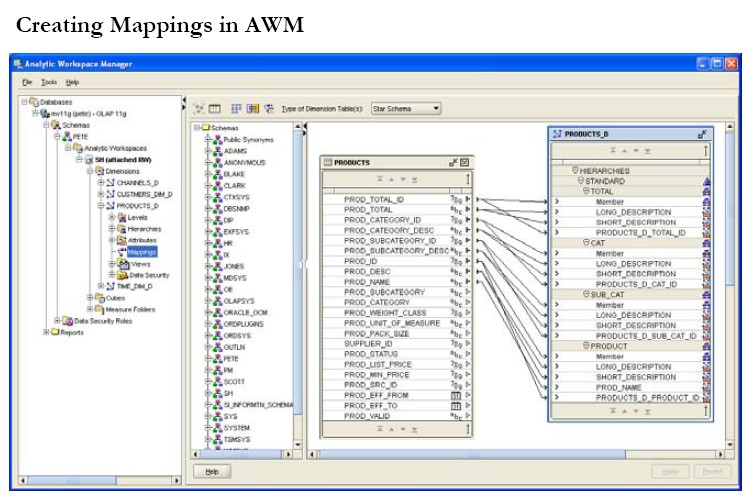
In order to load the data into the dimension, mappings must be created to associate the columns in the tables holding the dimension source data and the attributes in the dimensions. Using AWM this is a simple task of dragging lines between the source table column and the target dimension attribute as shown in the figure below for the Product dimension.
Here we can see columns in the PRODUCT table, such as PROD_DESC, linked to their attributes in the Product analytic workspace dimension, for example, the long and short descriptions at the lowest Product level of the hierarchy.
The last step in creating the dimension is to populate it by executing the mappings and is performed by selecting the Maintain option from the right click menu for the dimension. This executes a process that :
- transfers the data from the source object into the dimension object within the analytic workspace
- and implicitly validates the dimensional data.
- compare this to SQL Dimensions which are metadata about the structure of a dimension held in the relational tables: when new data is loaded into the tables used for the dimensions, it is not automatically validated to ensure that is conforms to the dimension structure. Consequently, SQL dimensions need the additional step of validating their structure by calling the VALIDATE_DIMENSION procedure in the DBMS_DIMENSION package.
Step 5 Creating the Cubes
Once the Customer, Channel and Month dimensions have also been created, the cubes may be created and populated with equal ease by right clicking on the Cube sub-tree in the navigation pane and selecting the “Create” option. The dimensions that define the shape of the cube are selected. In our example, the four dimensions Time, Products, Customers and Channel define the SALES cube and the dimensions Time, Product and Channel are used for the COSTS cube.
At this point when the cube is being created, there are a number of important options that may be specified which define the cubes storage structure and that can considerably improve the time to build the cube. The most important of these are:
- Dimension Order and Sparsity. Specify the dimension order to improve build and aggregation performance by listing the dense dimensions first. Dense dimensions are those that have fact data values recorded against a high proportion of their dimension values.
- Compression. Select the compression option if the cube data is very sparse, i.e. the ratio of real data values to ‘null’ data values is extremely small. In most cases, this option is turned on.
- Aggregation. Specify the aggregation method and operators to use. In Oracle Database 11g there are now two methods: the new Cost Based Aggregation method and the previous level based method.
- Partitioning: Specify how the cube is to be partitioned in order to improve load performance.
New in Oracle Database 11g is the Cost Based Aggregation method where the OLAP Engine determines the most expensive cells to aggregate and stores the aggregated value for those cells. A value of 0 to 100 can be set – the higher the value then the larger the data set that will be pre-computed and stored. A good rule of thumb is to use a value of 35. The level based aggregation method can still be used where the levels are specified in the hierarchies at which the aggregations are to be physically stored. This provides more control over the levels that will be pre-computed and good strategy is to specify the aggregates to be calculated at alternate hierarchy levels.
Partitioning cubes should not be confused with the Database Partitioning option: for cubes it defines how the cube is stored as separate components within the analytic workspace. To partition your cube, choose a level within one hierarchy of one dimension: a different partition is then used for each data value at that level. For example, our SALES cube uses a time dimension that has month as its lowest level and so specifying the cube partition strategy at either the Quarter or the Year level would be a good strategy. Partitioning cubes benefits the cube load and aggregation performance. It can also improve query performance because a query may be isolated to a single partition.
Step 6 Creating the Measures and the Cube Mappings
Now we have defined the dimensions for our cube and its storage structure, we must specify the data it is to contain (the measures) and the mappings to the source data. When we define the measures for a cube, we define how the fact data is held in each cell of the cube. The cube mappings are defined just as we did for dimensions by dragging lines between the source relational table and the cube definition.
Step 7 Creating the Cube Materialized Views in Oracle Database 11g
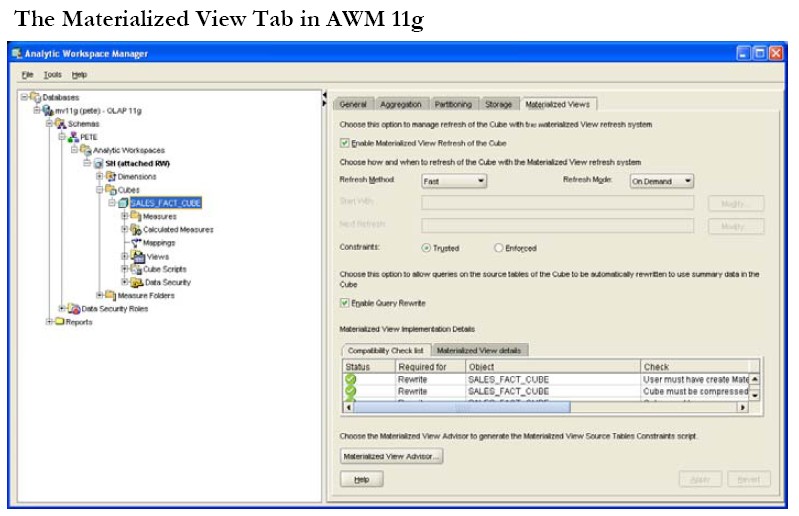
Oracle Database 11g introduces the capability to create cube materialized views over the analytic workspace cubes and dimensions and enable query rewrite to transparently rewrite to them for user queries that are written in SQL against the base source tables. The new cube materialized views are controlled via AWM using a new Materialized View tab for the cube as shown below.
By selecting the “Enable Materialized View Refresh of the Cube” check box, the new cube materialized views are created for the cube and its dimensions when the cube is maintained. The cube materialized view naming convention uses the cube name with a “CB$” prefix. The new cube materialized views are also able to benefit from the refresh capabilities for loading data which is also controlled from this tab and is explored in more detail in a later section. Don’t forget to select the option “Enable Query Rewrite” otherwise the cube materialized views will not be made available for query rewrite to use.
Step 8 Populating the Cube
The final step in defining the analytic workspace on Oracle Database 11g is to maintain and populate the cube, after which it is available for querying. During this stage, data is loaded from the cube data source, for example the relational table SALES_FACT in our case for the SALES cube, and joined to its dimension values and stored in the cube. It is also at this point that the aggregations that were specified for the cube are performed and stored. The cube organized materialized views are also created for our cubes and dimensions and are refreshed. Once the data has been loaded then the analytic workspace is ready to be queried.
Step 9 Refreshing The Cube Materialized Views
If we had maintained the cube without checking the tick boxes on the Materialized View tab, then our new cube materialized views would be built but marked as unusable. In this case, before they can be used we need to manually ensure that their data content is up to date and for them to be marked as fresh. To do this we call the REFRESH procedure in the DBMS_MVIEW package from SQL*Plus as shown below to perform a complete refresh on the cube materialized view for the SALES_FACT_CUBE cube.
EXEC DBMS_MVIEW.REFRESH(list=>’CB$SALES_FACT_CUBE’,method=’C’);
Alternatively, we can also use the BUILD procedure in the new DBMS_CUBE package, which will automatically refresh any stale or unusable materialized views over analytic workspace dimensions prior to refreshing the cube materialize view.
EXEC DBMS_CUBE.BUILD(’SALES_FACT_CUBE’);
The final step before the cube materialized views are usable by query rewrite is to collect statistics on them using the new DBMS_AW_STATS package as follows: </code>EXEC DBMS_AW_STATS.ANALYZE(‘SALES_FACT_CUBE’);</code>
How they are queried
Now we have seen how to build the materialized views and the analytic workspace and its cube, we will look at how they are queried.
A significant advantage is provided in Oracle Database 11g with the ability for materialized views and query rewrite to be used to extract data from the analytical workspace because the user and the reporting tools do not need to even be aware of the existence of the analytic workspace or of its structure, its cubes or dimensions in order to take advantage of all of its capabilities.
The tools construct SQL against the relational base tables and query rewrite will simply translate it to use the materialized views wherever possible. The table below summarizes this advantage where query rewrite is used to deliver analytic workspace performance and functionality to tools using regular SQL against the relational base tables.
Of course, in both Oracle Database 10g and 11g it is possible to define relational views over the cubes and use slightly differently structured SQL queries to access these views and hence the AW. This was a manual process via AWM for Oracle Database 10g but is fully automated in Oracle Database 11g.
If our data warehouse only uses the analytic workspace and not relational tables for reporting, then using the correct tool to access the analytic workspace is paramount for getting the best value from your data and from your investment. Oracle provides a number of powerful graphical tools and interfaces specifically to enable queries against the analytic workspace to be easily constructed and executed.
Refreshing Analytic Workspace Cubes
With the introduction of cube based materialized views in Oracle Database 11g, this means that the refresh mechanisms that materialized views have enjoyed, are now available to Analytic Workspaces. The most significant of these are the abilities to use materialized view logs and partition change tracking to perform a fast refreshes with considerable improvement in performance. A new refresh mechanism, only available for cube materialized views, is introduced in Oracle Database 11g called FAST_SOLVE. This method incrementally re-aggregates the cube by detecting the data changes without using materialized view logs. Previously in Oracle Database 10g, the ability to fast refresh just the changed data was not available and identifying the changed data in the source table had to be built into the mappings. For example, by using a view based on the source table as the data source rather than the table itself the view definition can used a WHERE clause to identify new or updated rows. Using a partitioned cube will significantly improve the data load and refresh times compared to an unpartitioned cube because it enables the database to automatically use parallel load processes.


